The technology
So Near Field Communication is the same technology that you find in contact-less credit cards, hotel key cards or public transport cards. Some of these have cleverer protection to stop you from using them fraudulently. The tags are passive in that they don’t require any power (that comes from the device scanning them). They typically hold a few hundred characters of data. So they are too small to hold our content. Typically they are a trigger that instructs the phone to do something. On Android you can set them up to do many different tasks – e.g. logon to a wireless network with a given password (something else you might want to add in your museum!).
In our case the application we’ll install will understand the data on the NFC card and will trigger showing video, images or audio.
Purchase NFC tags
So, firstly you’ll need to obtain some NFC tags. They come in all shapes, sizes and standards. I’ll skip the deep technical details for now – but tags with chips NTAG213, NTAG215 or NTAG216 are all suitable for our project. The simple description is that the higher numbers can hold more data. It’s possible to buy cheaper NFC tags that aren’t compatible with all devices – so stick to those listed above. Normally I’d suggest going for those with a larger surface area as they give a better scanning range. You can buy them from amazon, ebay or direct from a specialised dealer (I often use zipnfc.com). In order to have a play you can pop over to amazon and probably ‘prime’ a small quantity for next day 🙂
While I’m developing I quite like to use the plastic credit card style tags, over the sticker style versions. They are a bit more robust and you can keep reusing them.
Install the NFC App
There are a number of android applications that let us write data to NFC cards. My favourite is ‘NFC Tasks’ by Wakdev. There is a free and a pro version.
https://play.google.com/store/apps/details?id=com.wakdev.nfctasks
https://play.google.com/store/apps/details?id=com.wakdev.nfctools.pro
NFC Tasks Android Application
You’ll be able to use the free version for this project. It’s a great application so if you’re able to – support the developer and buy the pro version for a few pounds.
If you’re installing from the Play Store on the device then search for: NFC Tasks and make sure the developer is Wakdev.
Configure the NFC cards
Now we’re ready to create an NFC card that triggers the application. We’re going to add two ‘records’ – the first which contains the filename of the content and the second contains the description text to display in the app. We’ll do it for the content Lion.mp3.
Let’s go:
- Place an NFC tag on the table – slightly away from the device.
- Launch ‘NFC Tasks’ Application. If this is the first time you’ve launched it then there are some help screens to skip through.
- Normally when you’re started you’ll be faced with a screen with a number of menu options. We’re going to use the ‘WRITE’ menu.
Write Menu –> Add a record
- Choose ‘Add a Record’ and then ‘Text’
- Enter the file location: /storage/emulated/0/NFC/Content/Lion.mp3
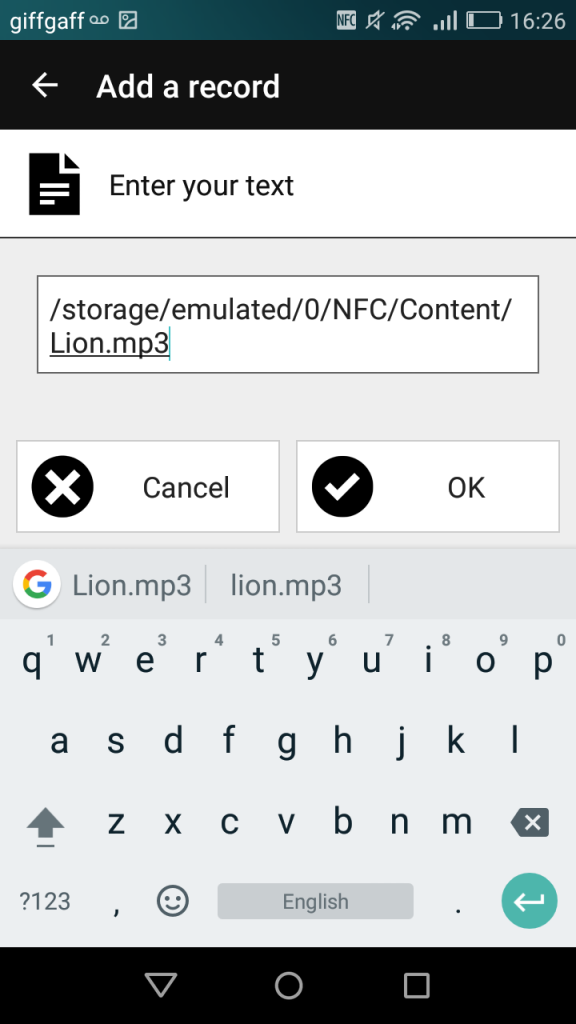
Enter the filename exactly (make sure the case matches)
- Click OK.
- You’ll see it’s added a new record.
- We can optionally add some description text. As this is a practice go we’ll go ahead and do that.
- It’s the same process as before: ‘Add a Record’ and then ‘Text’
- Enter the description: Lion of Knidos
- Click OK and we have two records.
- To write this information to the card – click the ‘Write’ button (it’s halfway down the screen and not to be confused with the ‘WRITE’ menu)
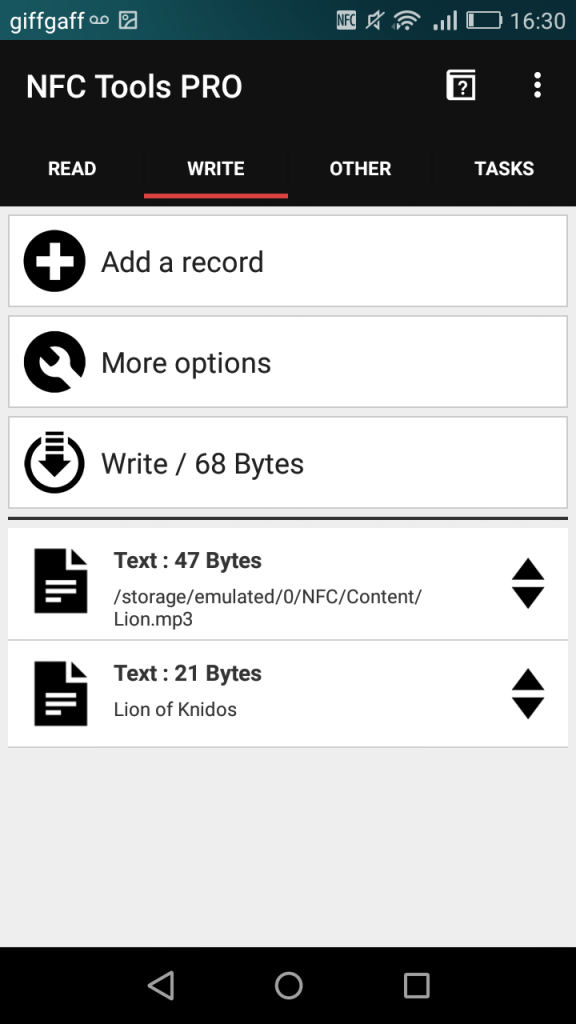
Ready to Write – with both records added. Note the order is important.
- When you see the message ‘Approach an NFC tag’ lift your device and place it over the NFC tag
- You should see the ‘Write complete!’ message and a big green tick
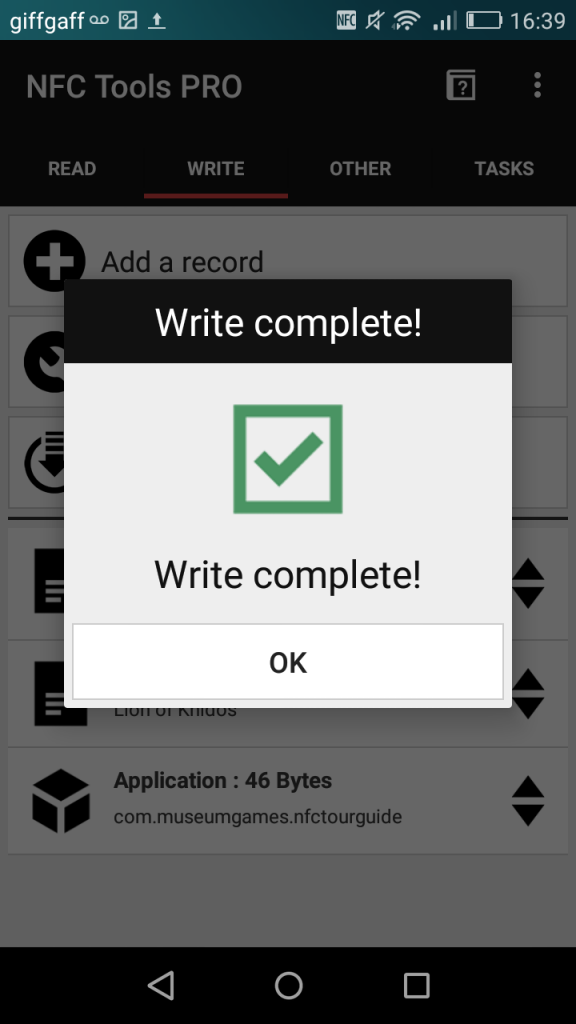
Write Complete! Congratulations
Congratulations – that’s your first NFC card ready to go. You can repeat this process for the other content and cards – remembering to change the file location:
You should now have a device with content and NFC tags set up as triggers. Let’s pull it all together.