Connecting Photo Spheres together
By linking together Photo Spheres it’s possible to navigate a wider location. Photo Spheres are discrete locations rather than continuous. So this means it is a collection of fixed points in the world that we connect together in a web structure. Again you’ll have seen this in ‘Street View’ where you teleport between individual locations.
Until recently Google allowed you to create your own private mini ‘Street View’. It was possible to create your own collection of Photo Spheres and use them to navigate any space you like (known as ‘constellations’). This would allow you to recreate someone moving around a space for example the inside of a museum.
Google have recently disabled this feature – although there are promises that they will re-instant this. It is still possible to create your own Photo Spheres and integrate them with ‘Street View’. It is also possible to upload floorplans of your internal space and then associate them with hi-resolution Photo Spheres. There are professional companies with the necessary equipment and experience who are Google Authorised and will map out your entire public space for you.
An example of this is the Royal Shakespeare Theatre in Stratford-Upon-Avon:
http://maps.google.com/maps/place?cid=1907729822977043429
This web address will bring up ‘Google Maps’ with the Royal Shakespeare Theatre highlighted. Choose the ‘see inside’ option from the menu on the left to start exploring the building.
Take multiple Photo Spheres
Hopefully you’ve got the hang of this now and can get a reasonable Photo Sphere.
The next step is to take a few Photo Spheres that we will eventually link together in our own mini ‘Street View’. It’s not essential but ideally these would have a natural point where we could join them together. The most obvious way is the same technique that ‘Street View’ uses – where you can see from one Photo Sphere into another.
If needed we could fake our virtual space by using closed doors. If you can’t see between the spaces then they don’t need to be joined in the real world.
Copy the Photo Spheres to your Computer
It’s just a case of connecting your phone to your computer with a micro-USB cable. You can find your Photo Spheres in the DCIM/Camera/ folder and the files will have the prefix PANO.
At this stage you could load the Photo Spheres into an Image Editing program and touch up any stitching errors by hand. It’s not worth it for these practice ones.
HoloBuilder – Virtual Tour
SORRY - THIS DOESN’T WORK ANYMORE :( HOLOBUILDER HAVE CHANGED THEIR COMPANY DIRECTION SO THIS TUTORIAL IS INVALID. IF THERE IS INTEREST I’LL FIND AN ALTERNATIVE SOLUTION.
HoloBuilder is a webapp that allows us to build Virtual Tours out of Photo Spheres. It also takes care of the hosting of your Virtual Tours once complete. You can share the link or embed on your own website. Essentially replacing the functionality that ‘Google Maps’ has disabled.
Navigate using your browser to: https://www.holobuilder.com
There’s a short video that explains how simple it is to build your tour. Half way down the page click the ‘Watch Our Tutorial Video’ (the tutorial video is slightly out of date – so don’t be concerned that the User Interface has changed a little!)
- It’s simply a case of uploading all your Photo Spheres to the site – these become known scenes.
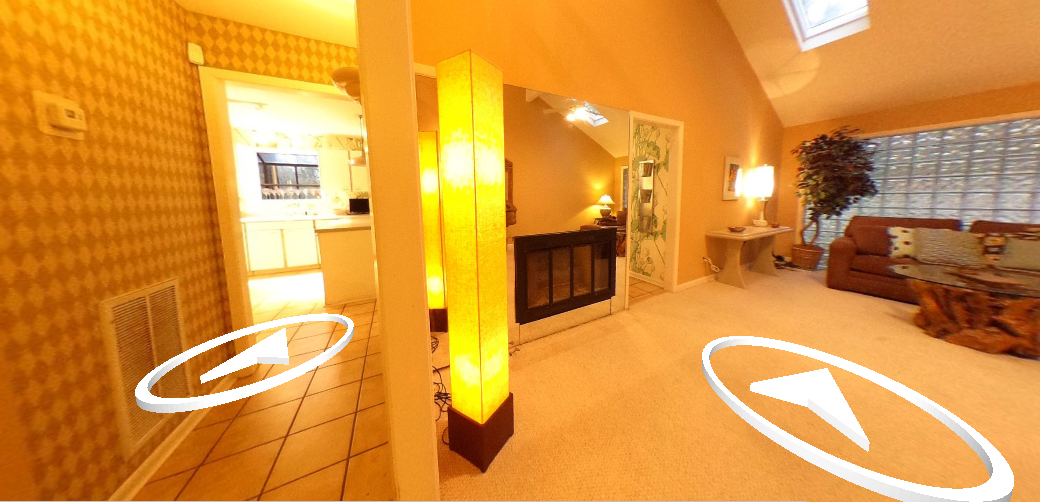
- You then add objects (e.g. an arrow) into the scene by choosing from the menu on the right.
- Give the arrow an action which will be ‘Go to Scene’ and you’ll put in the desired scene.
- Repeat this process for all rooms (remember you’ll want to return back to the room you came from)
- Use the ‘Play’ icon to try it out for real.
- When in ‘Player Mode’ the Edit icon takes you back to the Editor
You’ll see there are lots more options you can play with for instance you can add information boxes that pop-up with additional details when clicked on. Feel free to spend a bit of time improving your Virtual Tour using these extra features.
Facing the correct direction when entering a room
In order to make the Virtual Tour feel like you are really moving through it – it is important that you begin the new scene facing the correct direction. Each scene has an initial orientation that it switches to as soon as it loads. The trick is to set the orientation to match how it should look when you first enter a room. You can do this using the camera icon on the right side of the scene thumbnail.
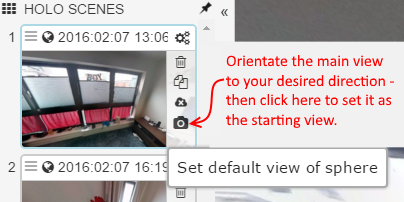
This works great however there is one slight problem. If you can enter a scene from two different directions then they will both have the same orientation when they start. This will break our illusion of naturally walking between these locations. The workaround for this is to make multiple copies of each scene:
- If a room can be entered from multiple directions then you need multiple copies of the scene.
- Update each copy to have a different starting orientation (relative to the direction they are coming from).
- Update the objects that have the action ‘Go to Scene’ to point to these new scenes.
Tip: It’s best to do this replication of scenes as the final step in your development. Otherwise any new alterations you make will need to be repeated in all your ‘replicated rooms’.
Saving & Sharing
Give your Virtual Tour a test and wander between all your scenes. Your objective is to find ‘bugs’ at this point – so try your hardest to break it!
Once you’re happy with your Tour Save your progress (you will probably need to create a new HoloBuilder account – if you haven’t already been prompted to do so). Now you are able share your tour. You’ll get more useful options if you select the ‘Advanced’ tab. My suggested settings are:
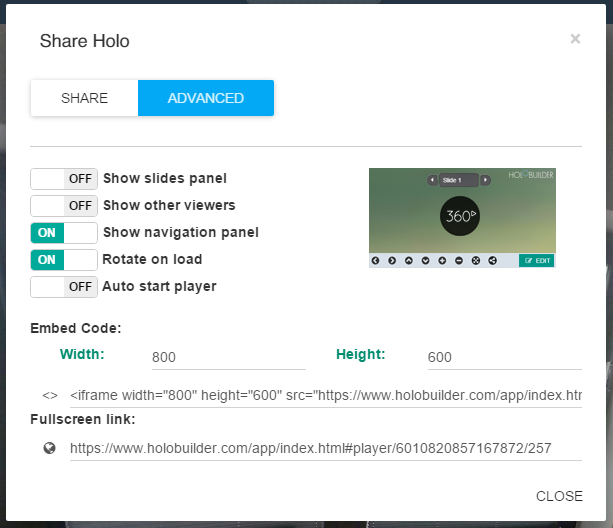
Copy the ‘Fullscreen link’ and share it with someone else so they can give it a try! Or if you prefer you can take the ‘Embed Code’ and include it on your website.