Advanced: Multiple Choice Quiz
You can use your new found knowledge to build a PowerPoint multiple-choice quiz. It actually doesn’t require any additional functionality than we used to build our straight-forward exhibit interactive.
The quiz page set-up follows a repeating format.
- Page 1: Multiple Choice Question and Answer options
- Page 2: Result – correct answer
- Page 3: Result – wrong answer
You need to wire up the hyperlinks so that correct answers go to the ‘correct slide’ and wrong answers go to the ‘wrong slide’. The ‘correct slide’ will contain a congratulation message and perhaps extends the answer in some way. The ‘wrong slide’ provides the correct answer and explanation.
Note: While it is possible to keep a running score – this requires the use of code (Visual Basic for Applications Macros). This is outside the scope of these projects. If you were to explore this as an extension exercise please note that PowerPoint Viewer does not support Macros – so in order for it to run you would also need the full version of PowerPoint on the PC.
Advanced: Map Interactive with Videos
You can also extend your Interactives by using audio, video or maps. This example uses a map for the main menu and then each location triggers an associated video clip.
This main menu page works exactly like the main menu from out standard interactive. The big difference is that I’ve laid out the ‘Image buttons’ on a map. When a user clicks on a button they are taken to another page (same behaviour as with our ‘Gallery Page’) but this time it shows information and video related to that location.
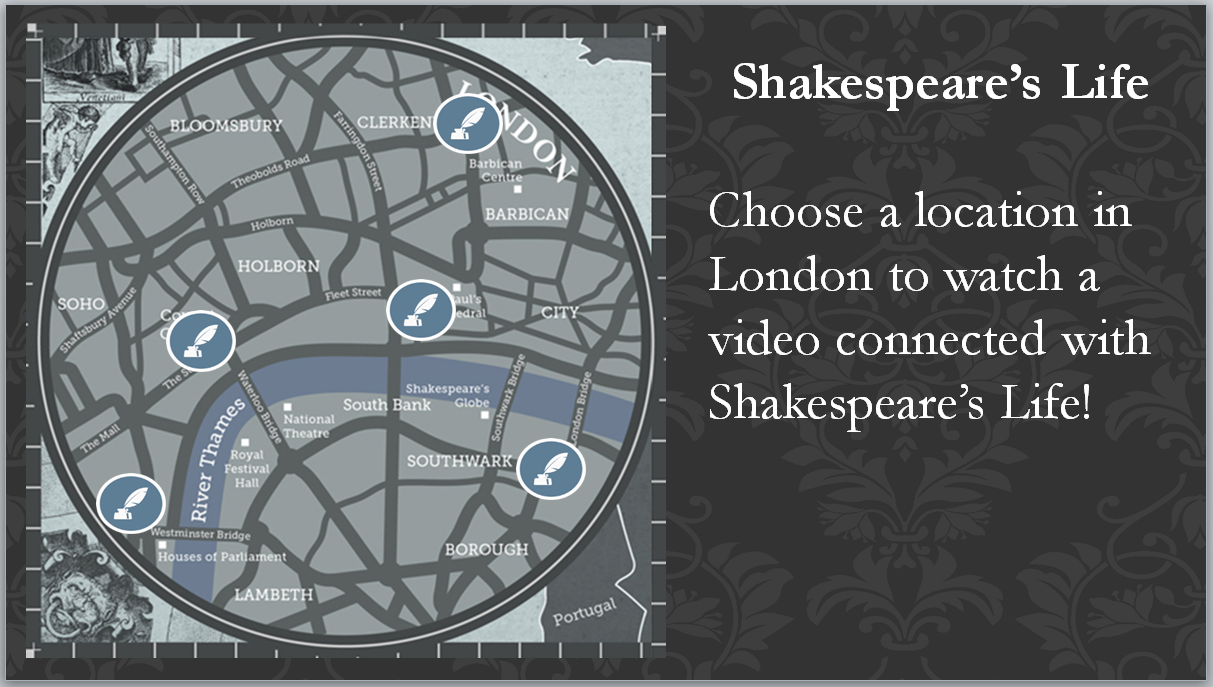
Our ‘Location Page’ is very similar to our ‘Gallery Page’. It still shows some content and has a ‘back button’ to return to the main menu. The content is laid out slightly differently and has the addition of a video clip as the main feature.

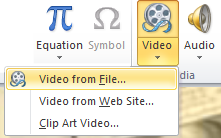
To add a Video, from within the ‘Insert Ribbon’ choose the ‘Video’ drop down and select ‘Video from File…’ This will bring up a ‘file dialog’ and you can select your video format. As we are using a ‘low-powered PC’ my video files are lower resolution and have been converted to the .wmv filetype. This is a Microsoft standard – so generally Microsoft products are happier using it.
Once you have your video in place you can make adjustments to it just as if it was an image, e.g. size, position and style.
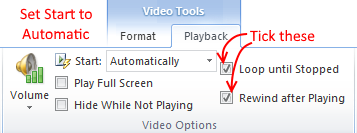
To ensure the video behaves as desired we’ll need to change a few settings. Under ‘Video Tools’ select the ‘Playback Ribbon’. You’ll want to set the video to start ‘Automatically’ and ensure that ‘Loop until Stopped’ and ‘Rewind after Playing’ are both ticked.
Note: there is an additional issue with video playback which may become a problem later. There is a ‘Gotchas’ section at the end of this document that explains how to overcome this.
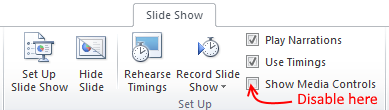
When the user clicks on a video they will get addition controls to ‘scrub’ through the clip. I felt that the icons were too small to be functional on our touchscreen so disabled them.
To disable these too – open the ‘Slide Show Ribbon’ and untick the ‘Show Media Controls’ option.
Successfully working interactive
By now you should have a successfully working touch screen interactive perhaps involving maps, videos or quiz questions.
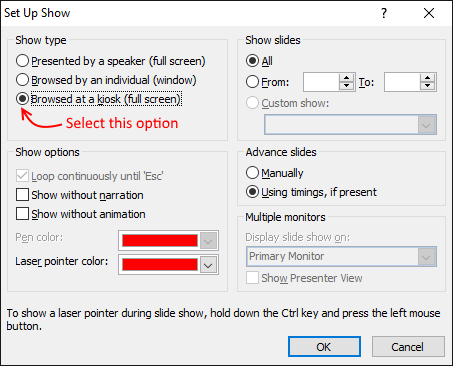
All that is left is to install this onto your ‘Stick PC’ and you should be up and running. There is one more change to make before we save the file for the final time. This is to ensure that we set the Slideshow type to ‘Kiosk Mode’. You can find this option in the ‘Slide Show Ribbon’ – choose the Set Up Slide Show option to bring up the dialog. Then select the ‘Browsed at a kiosk’ option.
Save the file – transfer it to a USB stick and then copy over to your target PC.
Gotchas
As we are pushing PowerPoint to its limits – there will always be some features that don’t work quite as we would like. In these cases we have to either accept the limitations or find a workaround that fixes our problems. Workarounds are often unintuitive – but in order to have complete freedom to make exactly the application we want we would probably need to employ expensive developers.
Problem: Animations not working when you return to a previous slide
PowerPoint has a feature that if you go to back to a previous slide it remembers how it was when you left it. Generally when giving a presentation this is a useful feature – however when we are using it to make an interactive this is a hindrance as we usually want each page to reset to their original state. It turns out that If you go to the slide again (only forward) it will reset it back to the original (the behaviour we would like).
Note: the video playback is triggered using animations – so if your video isn’t correctly restarting this is probably the reason.
Solution
There are two options but one involves writing code (macro) – which unfortunately isn’t compatible with PowerPoint Viewer.
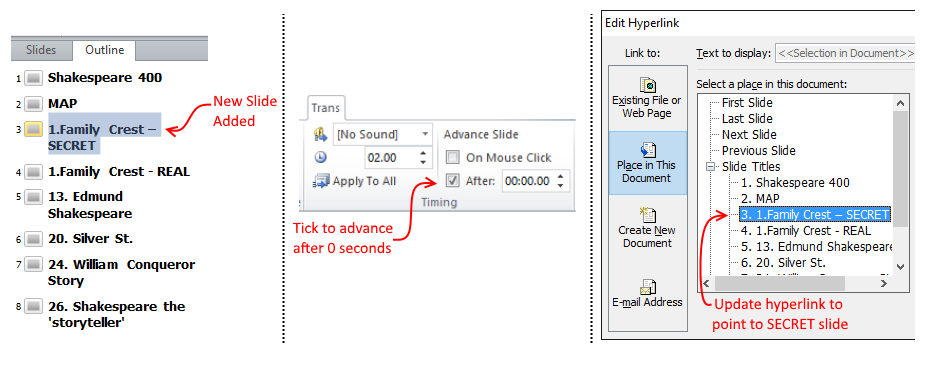
The only option available to us is to always transition forward to that slide. So the workaround is to add an additional (secret) blank slide before the real one and have that transition forward automatically after 0 seconds. The steps for this are:
- Insert new secret slide before the real slide.
- Set this new slide to immediately transition.
- Update any hyperlinks to point to our secret slide.