Building a Standard Museum Interactive
The content for this project could either be the sharing of museum-wide content (probably similar to what you already have on a website) – or you could focus it around a single exhibit. I’ll be building a very simple version of a museum-wide information kiosk based on Birmingham Museum and Art Gallery. I’ve chosen BMAG as it is was easy to find the text and images I needed on their website.
Building your PowerPoint slideshow
I am assuming that you have some basic knowledge of PowerPoint and have in the past put together a simple slideshow. Your first step is exactly the same process that you would use to build a standard presentation. The first page will eventually be your main menu page and contain images that will function as buttons. Subsequent pages will be where these ‘Image Buttons’ link to.
Here’s one I made earlier…
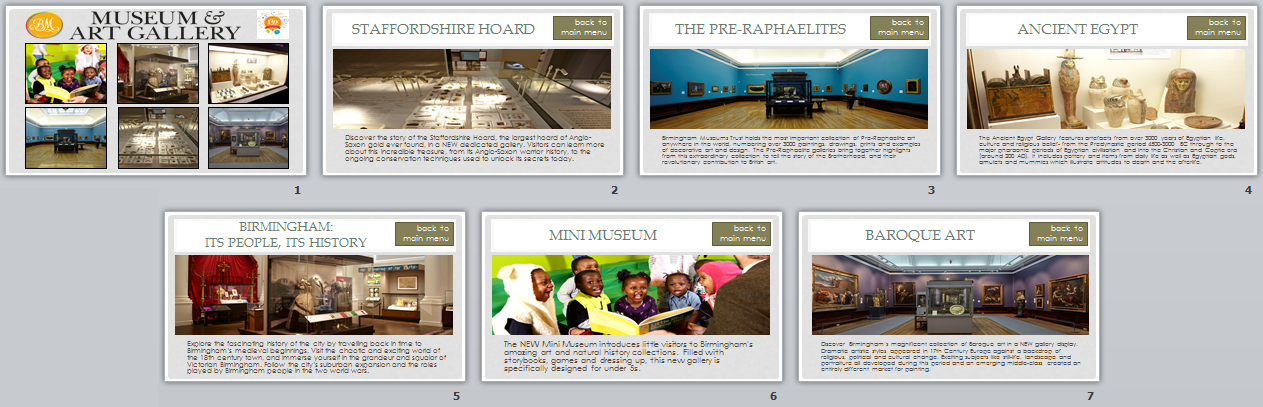
Here’s one that I built by taking my content off the Birmingham Museum & Art Gallery website. The first page is the ‘Main Menu’ and hosts a number of buttons that are small pictures of the individual galleries. The following pages show more information about the individual galleries. Each ‘Gallery Page’ also includes a ‘Back Button’ that when clicked takes you back to the main menu. Once I made the first ‘Gallery Page’ it was a simple to copy-&-paste them and just change the image and text.
The ‘Main Menu’ & ‘Gallery’ pages for my BMAG interactive look like these below:
You can practice using this BMAG version or using content relevant to your own museum but try to adhere to this simple structure of a ‘Main Menu’ & ‘Gallery Pages’
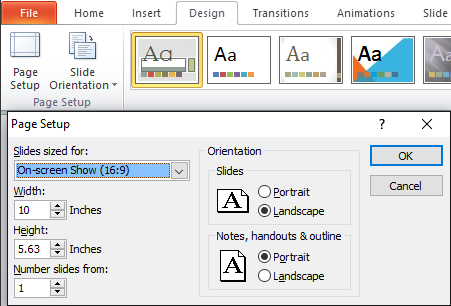
Aspect Ratio Advice: It’s likely that your touchscreen monitor will run in a 16:9 widescreen resolutions – the most common being Full-HD (1920×1080 pixels). PowerPoint still assumes that much of the world uses 4:3 resolutions for their projectors and screens – so it defaults to this.
You can set the resolution on the ‘Design Ribbon’ by choosing ‘Page Setup’ and Change ‘Slides sized for’ to ‘On-screen Show (16:9).
Converting your Slideshow to an Interactive
So the problem we are now faced with is that when we run our Slideshow on our touch monitor – it operates as a normal presentation and clicking anywhere on the screen just advances our slides. The behaviour we want is that clicking on an ‘Image Button’ takes us to the corresponding page and any clicks not associated with a button are completely ignored.
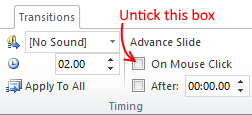
Disable forward advancement
On your ‘Main Menu’ slide, go to the ‘Transitions Ribbon’ and untick ‘Advance Slide: On Mouse Click’
Start your presentation again and confirm that clicking on the screen does nothing. You can still move through your slide deck with the arrow keys.
Once that is working repeat this process on all your ‘Gallery Page‘ slides.
Convert images into hyperlink buttons
The next step is to add in the button functionality. Again we’ll start with the ‘Main Menu’.
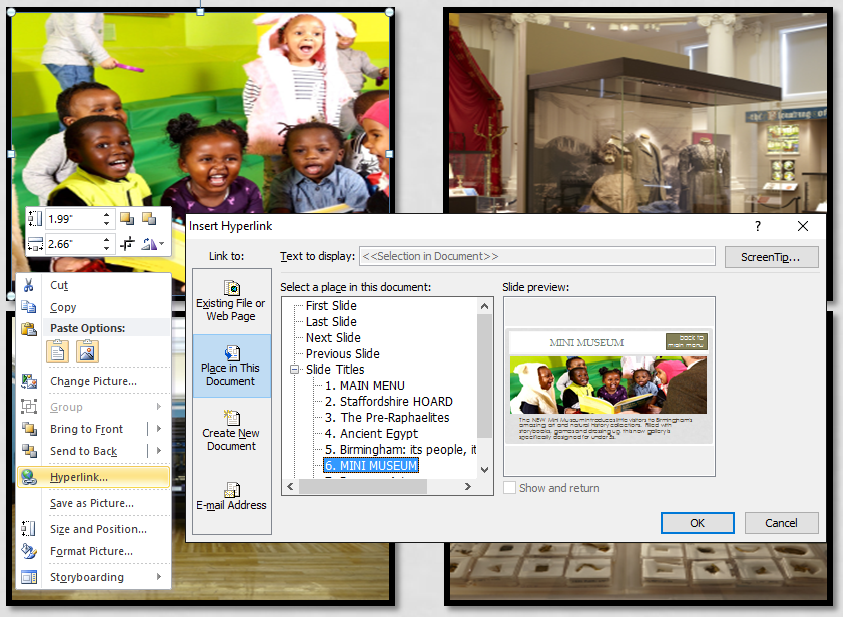
Right click on the first ‘Image Button’ that you would like to link. Chose ‘Hyperlink’ from the pop-up menu to bring up the ‘Insert Hyperlink’ dialog.
On the left of this dialog – chose ‘Place in This Document’.
You’ll then be presented with a list of all your slides. It is simply a case of highlighting the name of the slide that you want to jump to. Then click ‘OK’.
Start your presentation again and confirm that clicking on your ‘Image Button’ takes you to the target slide. You should also double-check that clicking other locations on the ‘Main Menu’ does nothing at all.
Once you’ve got that working – you can repeat this process for all the ‘Image Buttons’
Implement the ‘back button’ functionality
Finally, you can use the same process to make sure each ‘back to main menu’ button on each ‘Gallery Page’ takes us back to the ‘Main Menu’.
Note: if we had added the ‘back button’ functionality before we copied and altered each ‘Gallery Page’ then the hyperlink would have also copied.
Congratulations – you have a working Museum Interactive!
Once you’ve made it to this stage you should have a working Museum Interactive. Start it again and have a play. Make sure that all the buttons work – and spend a few minutes trying to ‘break it’.
Polish: Next Steps
Clever use of photos, fonts and graphic design will make a huge difference to how well the overall exhibit looks and is received by your audience. If you’ve got great skills in these areas then now is the time to go crazy. If you’re like me – you might prefer to cheat – and find an existing PowerPoint Template from somewhere online that matches the style we’re after.
PowerPoint has lots of features that allow you to make the interface look slick. A quick improvement will be the use of slide transitions. It’s generally advisable to use the more subtle effects – the more wizz-bang effects while exciting generally give a less professional feel. I thought the ‘Fade’ transition was a simple additional to add a level of professionalism to the interactive.
Chose the ‘Transitions’ Ribbon. From there you can choose the ‘Fade’ transition and then click the ‘Apply To All’ button.

Restart you presentation and see if you agree that the ‘Fade’ transition has improved things.
Try out some other transitions. You should see them preview in the window. You can change the ‘Duration’ to speed up or slow down the transition. Also, you’ll find that each transition has some customisation – e.g. which direction the transition starts from. You’ll find these in ‘Effect Options’
Where now?
Now you know the basics to build your own Museum Interactive. It’s possible to extend this to make a fairly substantial interactive if you willing to spend the time creating the content. With lots of content you may wish to create sub-menus.
You can experiment with more complicated features e.g. using audio and video, quiz based experiences, map user interfaces or add extra animations.